Tanya Leigh very nicely asked and I have agreed to provide a monthly technique tutorial for card making.
For the very first I have chosen an old favourite of mine called the ‘Kiss Technique’.
 For this technique you will need: -
· a solid stamp image
· a background stamp with a dominant image
· a light coloured cardstock
· a darker dye ink pad
· cardstock, paper, embellishments of your choice
· adhesive
Are you ready?

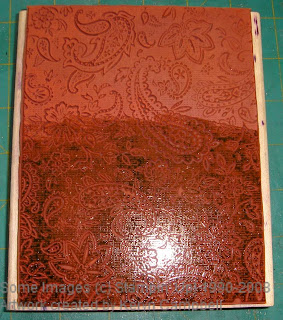
Ink your chosen background stamp, mine is Paisley by Stampin’ Up!, with your chosen dye ink.
 Place your chosen solid image stamp on to the inked background stamp like you were stamping it onto paper.
 Huff onto stamp to rewet the ink then stamp on to light coloured cardstock.
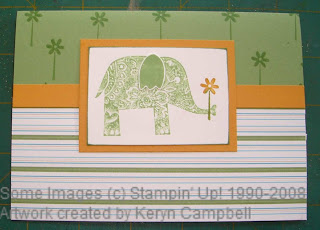
 Add other decoration to the image as you see fit. I’ve used a flower stamp also from the Wild About You stamp set inked with a more mustard and old olive marker before stamping.
 I trimmed around my image with my paper cutter then inked the edges of the white cardstock by running it through my Wild Wasabi Ink Pad, then matted it onto a piece of More Mustard cardstock
 Because my solid image is an elephant I have chosen to stamp my image in solid colour, trim around the elephant’s ear and adhere this to the ‘Paisley’ image.

To put my card together I have chosen a ‘Wild Wasabi’ A5 sized card blank to match my ink colour and again stamped the ‘Wild About You’ flower stamp to create a background.
I have then layered a strip of 60cm wide patterned paper from the SU East Coast Prep pack across the bottom of the card with a 1cm strip of more mustard cardstock to hide the join. Adhere the elephant image across the centre of the more mustard strip and all done!
I would love to see what you have created using this technique, cards, LOs, 3D items etc.
Happy Stamping
Keryn


2 comments:
This is adorable! I always forget about the kissing technique for solid images.
Jane
Cool. Never heard/seen that technique before.
Post a Comment