Saturday, December 25, 2010

How To Use Builder Wheels

Here's one of the cards that we made at my 'Welcome to the Summer Mini' evening on Wednesday. 

For the ladies that attended it was the first time they'd been able to see how the Stampin' Around Builder Wheels worked. 

For all of you who couldn't be there I've filmed a You Tube tutorial showing you how builder wheels work: - 


I hope that helps you see how to use the builder wheels in your projects.
Share

Tuesday, November 30, 2010

Don't Throw It Away

Making a new batch of Thank You cards yesterday there was, as always, one that didn't go quite as planned but rather than throw it away this is what I did:

This is my Thankyou card design for this month: - 


This time I was using up scraps of 'Lap of Luxury' designer series paper.  I'd done my stamping and punching and most of my sponging.


The next step was to sponge the 6.5 x 6.5cm scrap of designer series paper and attach the whisper white square to it.  Sponging is one of the best times to get ink on your fingers.


After almost throwing this piece away and a great deal of muttering I hit on an idea.  Why not use a scrap of cardstock to make a leaf.  I found in my scrap drawer a piece of already embossed concord crush cardstock and punched out a large oval shape.  This is the result.


I was so pleased with the result I made a couple more cards with the leaves.


Share

Quick and Easy Cards - Let the Paper Shine

Sometimes it's necessary to make a bulk lot of cards quickly.  They need to be simple but not boring.  This is a time when you want to let the gorgeous Designer Series Papers shine through.

Here's how I put together the 13 cards I managed to make today while fitting in a whole morning at Chipmunks with Cameron and babysitting my four year old nephew in the afternoon.  They had to be quick and easy.


Choose the Designer Series Paper sheet you want to use.  You can get nine cards from one 12x12 sheet.  Add two cardstock colours and a neutral.  I've used Jolly Holiday DSP with Cherry Cobbler, Old Olive and Very Vanilla Cardstock.


I cut my DSP sheet into nine pieces 100x143mm sponged the edges and stuck it to the centre of an A5 Old Olive piece of cardstock.
 
Add a 10x143mm cardstock strip across the centre to break the DSP into two pieces.  You could use ribbon if you wished.
 
Finish your card with the greeting and punches of your choice.  My Merry Christmas greeting is from the 'Contempo Christmas' stamp set.


Here are my nine cards all packaged up with envelopes in packs of three ready to go to the Kindy fair.  I also added some Thank you cards as a fourth pack. 


Share

OOPS reinked your Classic Ink Pad with the Wrong Colour

I have managed to successfully reink my Pear Pizazz ink pad and this is how I did it: - 

This is not something you want to try with an old and well used ink pad as it does take a bit of time.  As my ink pad was very new it was worth the effort.

Hold your Classic Stampin' Pad under a cold tap until the water runs clear. 


Leave in the sun to dry.

Reink your classic ink pad with the correct refill this time.  I ran lines of ink across the pad until it was all filled.  It took about 1/2 a bottle of ink.


Stamp an image, I used the a solid image just to make sure, to check that your classic stampin' pad is completely inked. I used the whale from the 'Animal Tales' stamp set.


I hope you never have to do this, but if you do, you now know how.


Share

Wednesday, November 3, 2010

Glitter Panel Cards

I've been having a great time this week being reminded, by Sue Madex, of a technique I tried many years ago.  I've always liked adding glitter to a card and preparing for Christmas is such a good time to indulge in glittery activities.  Beware this is one technique where you can't help but wear your dazzling diamonds for the rest of the day.

Glitter Panel Sample

To create the glitter panel you need the following: -

Whisper White or Very Vanilla Cardstock
Stamp Set of your choice
Heat and Stick Embossing Powder
Versamark Ink Pad
Dazzling Diamonds
Heat Tool

 - I stamped my very vanilla cardstock using Tree Trimming Stamp Set and Jet Black Stazon and Real Red Classic Ink.
 - Cover the entire cardstock square with versamark ink.  As versamark ink is pigment ink there is no chance of the classic ink smearing.
 - Liberally coat the versamark covered cardstock with Heat and Stick embossing powder and heat with heat tool.  Once the powder turns glossy stop heating if over heated it loses it's stickiness.
 - Cover the now sticky cardstock with dazzling diamonds and give it a quick blast with the heat tool to set the glue.
 - Embellish as you choose to finish off your card.

The supplies for my card are all Stampin' Up!®: -
 - Stamp Sets - Tree Trimmings, Occasional Greetings
 - Paper - Newsprint DSP, Basic Black and Very Vanilla Cardstock
 - Ink - Versamark, Jet Black Stazon, Real Red Classic Stampin' Pad
 - Punch - Designer Label
 - Accessories - Basic Black Satin Ribbon, HodgePodge Hardware, Mat Pack and Paper Piercing Tool, Stampin' Sponge, Paper Snips, Paper Cutter, Bone Folder, Snail Adhesive and Stampin' Dimensionals.


Share

Quick and Easy Thank You Cards


Made using the 'So Many Thanks' al a carte stamp set, that is included in the demonstrator starter kit, the fancy flower and 1 3/8" circle punches and the Designer Series Paper In Colour Hostess Gift, this is my Thank you card for customers from now until the 30th November.

Here is a video to show you how I made it: - 


Share

Tuesday, October 5, 2010

Christmas Tree Decorations Using Matching Stamps and Punches

I'm able to film videos again in natural light now it's Spring in NZ and the sun's come out.  Enjoy!


I'd love to see your take on the instructions in my tutorial.  I've set up
an album
in my Facebook business page so that you can show me your decorations.  Leave me a comment so that others visiting the page can pop over the see your hard work as well.


Share

Monday, September 27, 2010

Using Designer Series Paper to Choose Cardstock Colours

I actually got some cards made while I was away at Stamp Camp mostly because I'd put together some kits before I left home. I used left over Designer Series Paper as the starting point for my colour combinations.


When I had my cards laid out I could see that I had used a pattern to choose the colours to put with each of the different paper designs. Here's what I did:-

I chose a piece of DSP that measured 47mm x 95mm.


I then decided whether bright whisper white or a more muted very vanilla neutral cardstock would set off the paper best. With the bright colours in this paper I chose whisper white.


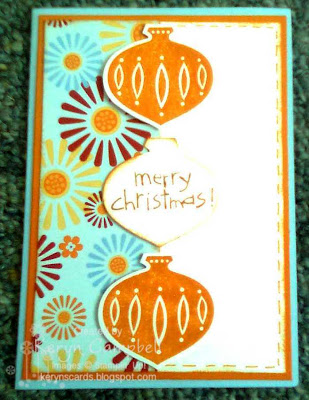
For my base card I chose the dominant colour in the paper which is 'Bashful Blue'. It's so handy that Stampin' Up!® has used it's cardstock colours in it's Designer Series Papers as well. For the mat colour and the ornaments I decided to pick the least dominant colour in the paper and that is 'Pumpkin Pie'.


Put together using Pumpkin Pie as my ink colour and the 'Contempo Christmas' stamp set with the matching ornament punch, here is my card.


Wednesday, August 11, 2010

Applying Rub Ons to a Glass Jar

I'd been having a bit of a tidy up in my office and in the process unearthed a lot of ribbon scraps that I'm sure will get used one day.  Perhaps they would if they were in a container on my desk in view.

So I found a jar in a cupboard washed off the label and gave it a good clean and dry and decorated it.  I wanted decoration where I would still be able to see the ribbon inside so rub ons were a great option.


Here's how I did it: -

Being an almost square jar it wasn't quite as hard to hold it still as it would have been with a round one but I still used a tea towel to keep it in place.


Choose the image you want from the full sheet or rubons and trim round it and it's backing sheet.


Carefully remove the backing sheet without touching the back of the rub on and gently press the rub on in position on the glass jar.


Use the popsicle stick that came with the rub ons or a bone folder - I prefer the bone folder - rub over the rub on image.  When it looks like it has stuck to the glass gently peel the top cover back.  If part of it hasn't stuck place it back and rub again.


Build up the design of your choice on your jar.


Cover all the sides and the lid.


Add ribbons or as a gift idea, chocolate, shortbread, etc, etc.

I'd love to see what you've made using this tutorial, please leave me a comment with a link to your project.


Share

Tuesday, August 10, 2010

Basics Video - Using a Crop A Dile to Set Eyelets

After using the traditional eyelet setting tools with a hammer, spring loaded eyelet setting tools which all have their place I've found that my favourite go to tool for punching holes and setting eyelets is the Crop A Dile.


I hope this helps you use your crop-a-dile or helps you to decide whether the Crop A Dile is the eyelet setting tool for you.


Share

Thursday, July 29, 2010

Loathe Colouring but Love Cutting

Then Paper Piecing might be the technique for you.


I've thrown together a very quick step by step tutorial using different coloured cardstock to colour the truck from the 'Loads of Love' two step stamp set.


I first stamped the truck in 'Night of Navy' classic ink on white, going grey & taken with teal cardstock. Then I cut right around the white image.


Deciding it just wouldn't work stamping the image on black cardstock for the tyres I coloured those in using a Black Stampin' Write Marker.


I cut around the Taken With Teal Image, cutting away the wheels, the window and front head light. While cutting away the window I accidently ripped the top piece of the frame so haven't been quite as precise in my cutting as I would normally have wanted. I used Two Way Glue to attach the taken with teal image over the white one.


From the Going Gray image I chose to cut out the wheel arches, bumpers and hub caps and attached those over the truck image using two way glue again.


Adding a Taken with Teal Cardblack some Whisper White and Basic Black cardstock for the road a bit of sponging in Going Gray classic ink and a greeting from the 'Basic Phrases' stamp set and the card is complete.


Share

Friday, June 11, 2010

Video - Alternative Use for the Scallop Square Punch

I thought it was a good idea to show you another way, apart from punching scallop squares, to use your scallop square punch.


See the reverse scallop border on this penquin card. It was punched using the scallop square punch.


Watch the video to find out how: -


Please leave me a comment if you have any questions or if you have any ideas for future videos you'd like to see.

Share

Wednesday, May 12, 2010

DSP Christmas Bauble

While discussing am upcoming workshop the hostess asked if I had any ideas for baubles she could use as gifts for a Mid Winter Christmas party she's planning. After searching my photos and tutorials I found that the one I use most often and is the easiest to put together was the one I didn't have any photos of.


So for Vicky and anyone else who is planning a Mid Winter Christmas party here are the instructions for a DSP Bauble. I did not invent this design and I can no longer remember where I saw it first. If it is your idea please let me know.


There's not much in the way of supplies or tools needed for this decoration: -


- 8 strips of Designer Series Paper - 1"x4" - I used Bella Rose DSP


- Crop A Dile or other hole making device


- Length of ribbon to match your paper tied in a loop. - I used 6mm Chocolate Chip Grosgrain


Place your DSP in a pile with alternate patterns up and punch a hole in each end in approx the same place.


Thread your ribbon through one hole and back through the other.


Use the ribbon to pull your paper strips into a C shape tying a knot at the top to hold it in place.


Fan out your paper strips to form a ball shape.


You can get four of these decorations out of one piece of 12x12 double sided paper and 54 out of a pack of designer series paper more than enough to decorate a Christmas tree.

I hope you enjoy these decorations and get lots made for your Mid Winter or End of Year Christmas celebrations.


Share

Monday, May 10, 2010

Technique Video - Quilited Top Note Card

I'd admired these cards an the blogs and websites of North American demonstrators so when Stampin' Up!® made the Top Note available in New Zealand it was one of the first dies I bought and this was one of the first cards I made.

I hope you find my video instructions helpful: -


Please leave a comment if you have any questions.  I'm always interested in hearing about techniques or tips that you'd like to see video.  Leave me a comment if you have any to suggest.


Share